Drop-in Integration Step back up
This guide is for developers and provides details to integrate online payment functionality through Drop-in supporting scenarios such as payment subscriptions.
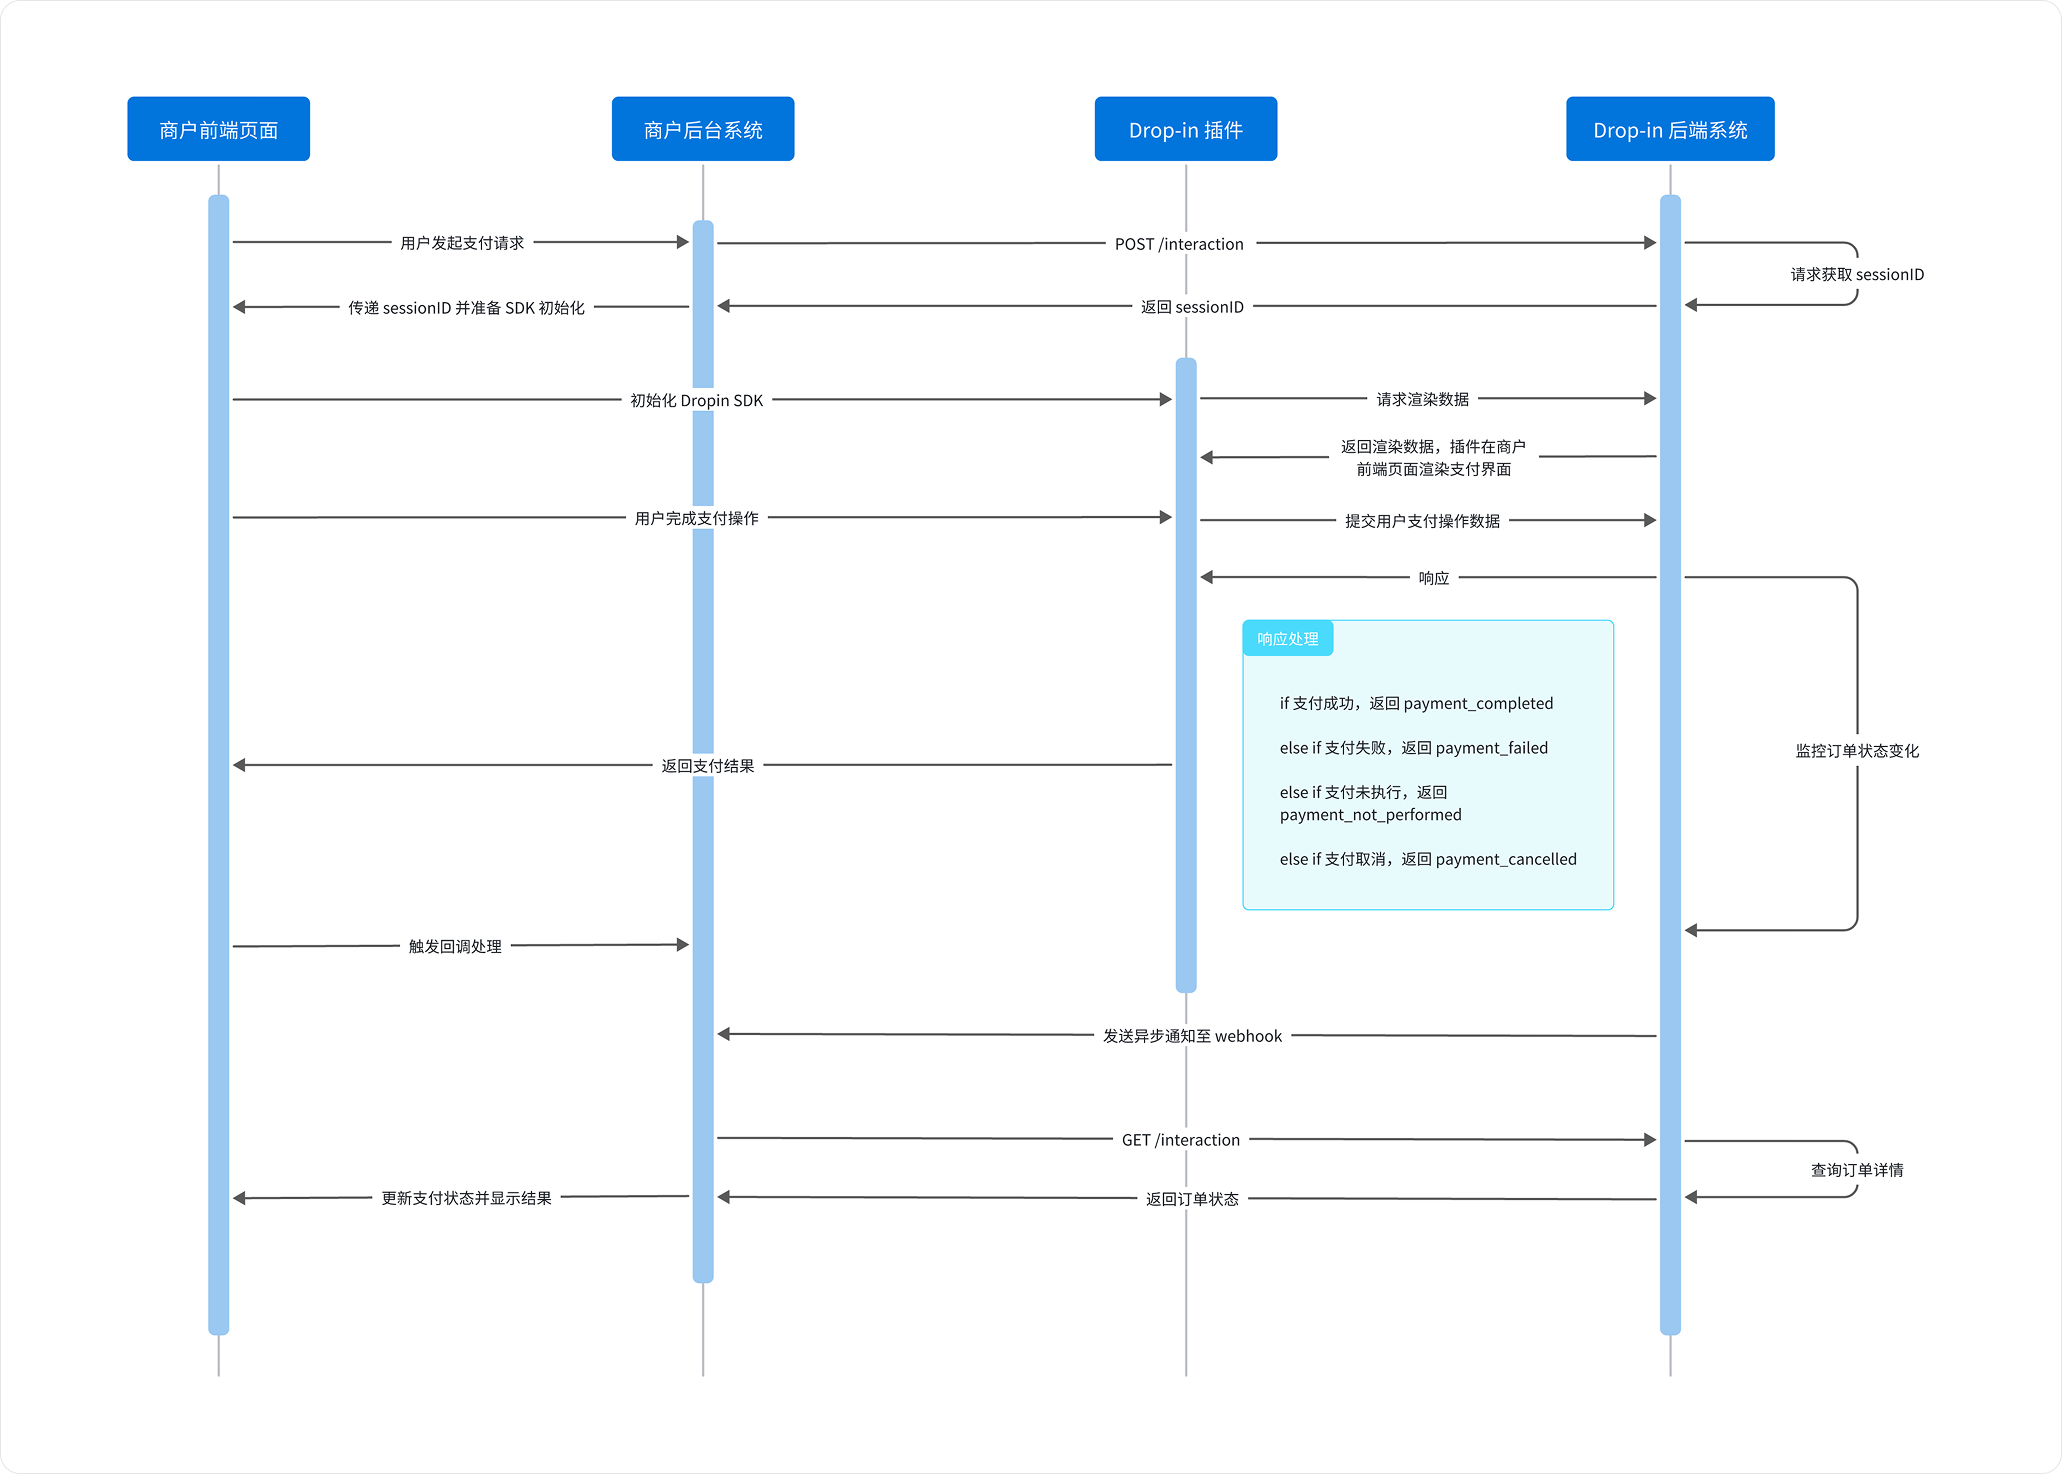
The core steps and data flow of the integration process are shown in the following figure. You can flexibly participate in the modules according to your actual needs.
1. SDK Integration
Load the JS resource via CDN
It is recommended to use our provided index.min.js as a fallback in case the CDN fails to load.
Latest version:
https://cdn.jsdelivr.net/npm/cil-dropin-components@latest/dist/index.min.js
2. Adding Drop-in to an HTML container
Add a container element to the front-end page to render the DropIn component, for example:
<div id="dropInApp"></div>3. Obtain sessionID
Before initializing the DropInSDK, you must first obtain the sessionID. The backend obtains the sessionID from the response of calling the integration API, which needs to be extracted and passed to the front-end DropInSDK.
All interfaces use KeyID and Key for authentication to verify the legitimacy of requests, without the need for additional signature encryption/decryption operations.
NoteTransaction authentication of the interaction interface is completed through the SignKey (in the Authorization request header) and KeyID in the request header.
For more parameter details, see the interaction API Interface details.
4. DropIn SDK Initialization:
Initialize the DropInSDK using the sessionID obtained from the previous step and other necessary parameters to render the payment interface and process user delivery:
const sdk = new DropInSDK({
  id: '#dropInApp',
  type: 'payment',
  sessionID: 'your-session-id',
  locale: 'en-US',
  mode: 'embedded',
  environment: 'UAT',
  appearance: {
    colorBackground: '#fff'
  },
  payment_completed: handlePaymentCompleted,
  payment_failed: handlePaymentFailed,
  payment_not_preformed: handlePaymentNotPreformed,
  payment_cancelled: handlePaymentCancelled
});
Required Parameters:
- id:CSS Container Selector
- type:Component Type
- sessionID:Obtain the unique
sessionIDfrom payment API. - locale:Interface language code(e.g.,
'en-US'、'zh-CN') - mode:Display Mode(
'embedded'or'fullPage') - environment:SDK environment(e.g.,
'UAT'for Sandbox,'HKG_prod'for Production)
Optional Parameters:
- appearance:Customize interface style
- Callback function:See next step
- Other parameters:Please refer to SDK reference for more parameters options.
5. Handling Payment Callbacks
Process the payment callback returned by the DropInSDK, record key data (such as merchantTransID), update the UI, and trigger subsequent operations.
-
payment_completed:When payment is successful.
return:{ type: 'payment_completed', merchantTransID, sessionID }- store
merchantTransID(For future transaction enquiry and refund) - **Update UI to show "Payment Successful"
- store
-
payment_failed:When payment is failed / declined.
return:{ type: 'payment_failed', merchantTransID, sessionID, code, message }- store
merchantTransID,codeandmessage - Display error message(such as “Transaction Failed:
{message}”)
- store
-
payment_not_preformed:Triggered when payment is not executed (e.g. user does not complete the payment process)
return:{ type: 'payment_not_preformed', merchantTransID, sessionID, code, message }- store
merchantTransIDandcode - ** Display prompts (e.g. "Payment not completed, please try again")
- store
-
payment_cancelled:Triggered when the user cancels the payment
return:{ type: 'payment_cancelled', sessionID }- ** Display prompt (e.g. "Payment Cancelled")
6. Handling Payment webhooks:
Set the webhook endpoint from step 4 to receive asynchronous notifications from Evonet. Notifications typically contain the following fields:
result: payment status codemerchantOrderID: To check order statusmerchantTransID: To carry out payment refundsstatus: Order status code, used to update the database order status- Other parameters:time, amount, etc.
NoteAfter receiving a notification, the plain text "SUCCESS" must be returned to indicate successful receipt. If no response is received, the system will periodically resend asynchronous notifications at the specified frequency (15/15/30/180/1800/1800/1800/1800/3600 seconds) until a "SUCCESS" message is received or the maximum number of notifications is reached.
For parameters, please refer to API Explorer interaction Notification.
7. Using Drop-in for subscriptions
It is possible to use Drop-in to setup subscription scenario, the integration flow is about the same as above, only few minor adjustments as below:
First Time Subscription:
-
Change in the 4th step (Obtain sessionID)
When calling the Interaction API, use the following parameters:{ "userInfo": { "reference": "your_user_reference" }, "paymentMethod": { "recurringProcessingModel": "Subscription" } } -
Save the Token
- After payment is completed, store the
tokenfrom either webhook or payment response API. - Store the
token.valuein your system and bind it withuserInfo.reference.
- After payment is completed, store the
Subsequent subscription (MIT Transaction)
- Use the Payment API to initiate the transaction.
- The request parameters must include (see the Appendix Payment API interface for details):
{ "paymentMethod": { "token": { "value": "Previously saved token value" }, "recurringProcessingModel": "Subscription" } } - Order Tracking:Use
merchantTransIDto track the order ID of the subsequent payments. - Capture transactions:
- Set
captureAfterHoursto 0 for immediate capture - If this field is not provided, the merchant must later call the
POST /captureAPI to perform manual capture.
- Set
8. Other Optional APIs:
Using GET /payment/{merchantTransID} to query a payment status, merchantTransID is obtained from payment.merchantTransInfo.merchantTransID
For authorized transactions, this API can be used to carry out capture POST /payment/{merchantTransID}/capture
For transaction that is captured, use POST /payment/{merchantTransID}/refund to carry out partial or full refund of the transaction.
Updated 3 days ago