

Drop-in Integration Step
This guide is for developers and provides details to integrate online payment functionality through Drop-in supporting scenarios such as payment subscriptions.
🌐 Language Switch / 语言切换
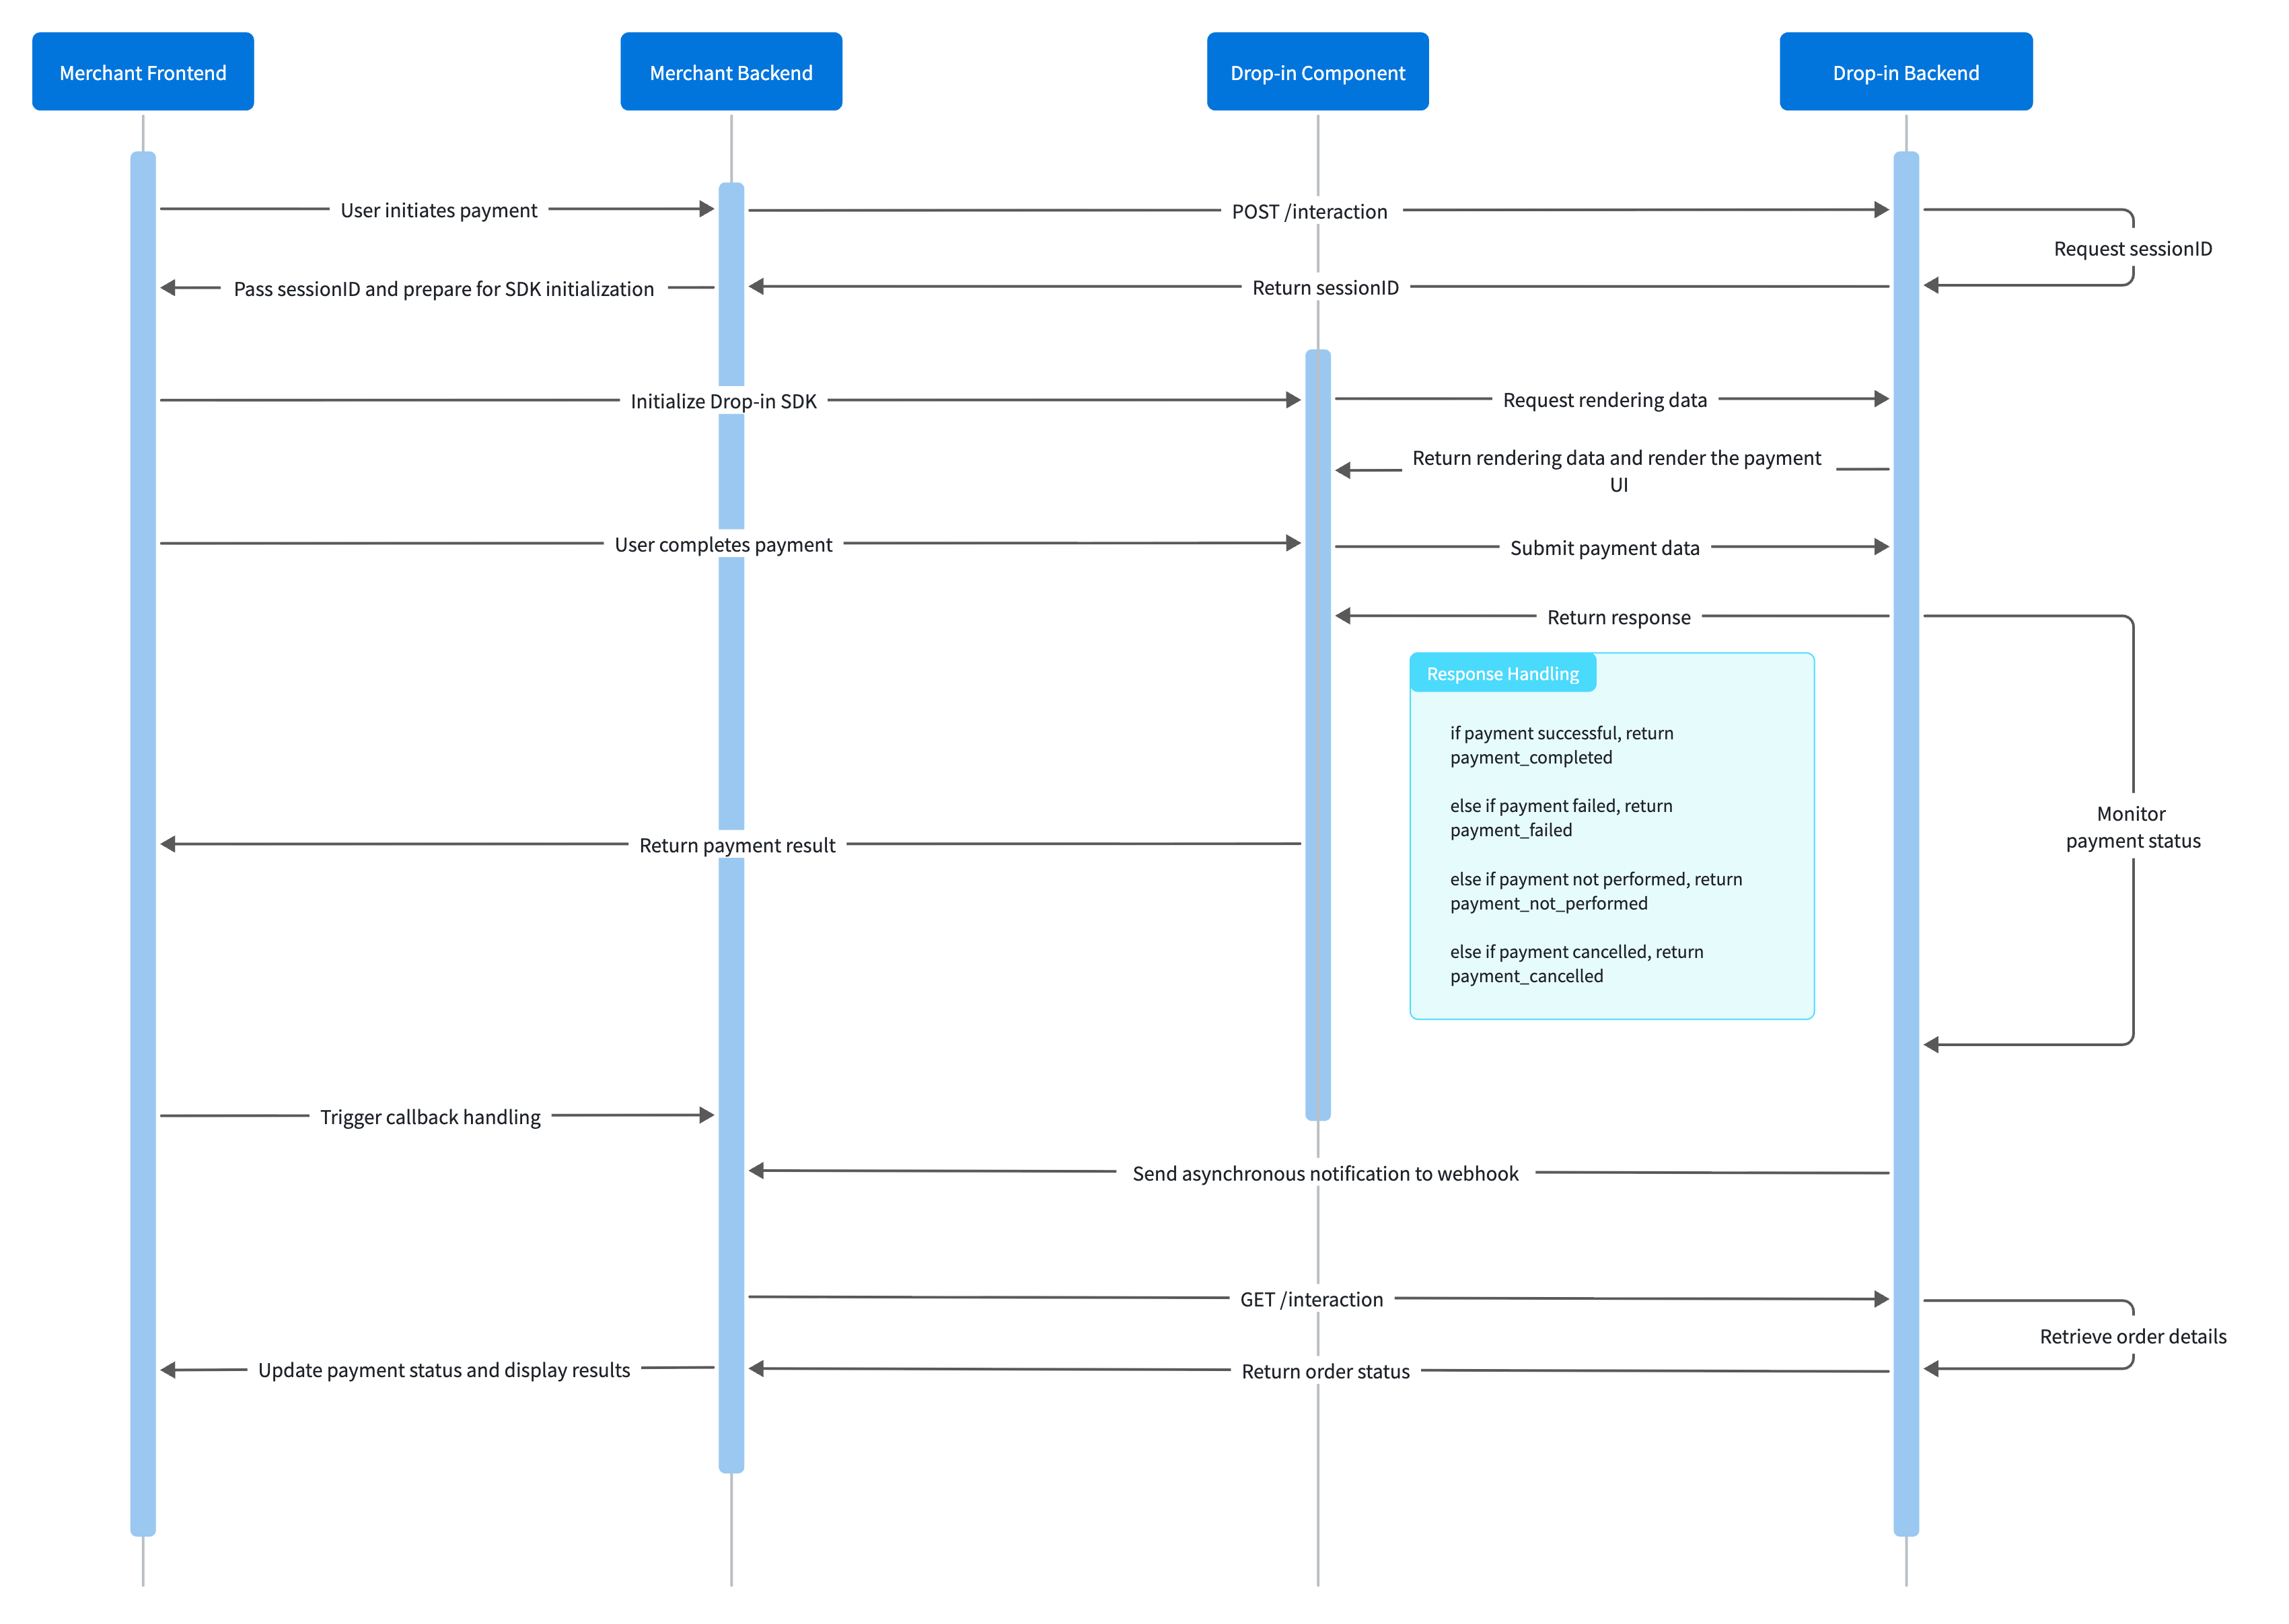
The following steps and field descriptions are designed to help you clearly understand the entire payment process and ensure a smooth integration.
1. SDK Integration
Load the JS resource via CDN
It is recommended to use our provided index.min.js as a fallback in case the CDN fails to load.
Latest version:
https://cdn.jsdelivr.net/npm/cil-dropin-components@latest/dist/index.min.js
2. Adding Drop-in to an HTML container
Add a container element to the front-end page to render the DropIn component, for example:
<div id="dropInApp"></div>3. Obtain sessionID
Before initializing the DropInSDK, you must first obtain the sessionID. The backend obtains the sessionID from the response of calling the integration API, which needs to be extracted and passed to the front-end DropInSDK.
All interfaces use KeyID and Key for authentication to verify the legitimacy of requests, without the need for additional signature encryption/decryption operations.
NoteTransaction authentication of the interaction interface is completed through the SignKey (in the Authorization request header) and KeyID in the request header.
For more parameter details, see the interaction API Interface details.
4. DropIn SDK Initialization:
Initialize the DropInSDK using the sessionID obtained from the previous step and other necessary parameters to render the payment interface and process user delivery:
const sdk = new DropInSDK({
  id: '#dropInApp',
  type: 'payment',
  sessionID: 'your-session-id',
  locale: 'en-US',
  mode: 'embedded',
  environment: 'UAT',
  appearance: {
    colorBackground: '#fff'
  },
  payment_completed: handlePaymentCompleted,
  payment_failed: handlePaymentFailed,
  payment_not_preformed: handlePaymentNotPreformed,
  payment_cancelled: handlePaymentCancelled
});
Required Parameters:
- id:CSS Container Selector
- type:Component Type
- sessionID:Obtain the unique
sessionIDfrom payment API. - locale:Interface language code(e.g.,
'en-US'、'zh-CN') - mode:Display Mode(
'embedded'or'fullPage') - environment:SDK environment(e.g.,
'UAT'for Sandbox,'HKG_prod'for Production)
Optional Parameters:
- appearance:Customize interface style
- Callback function:See next step
- Other parameters:Please refer to SDK reference for more parameters options.
5. Handling Payment Callbacks
Process the payment callback returned by the DropInSDK, record key data (such as merchantTransID), update the UI, and trigger subsequent operations.
-
payment_completed:When payment is successful.
return:{ type: 'payment_completed', merchantTransID, sessionID }- store
merchantTransID(For future transaction enquiry and refund) - **Update UI to show "Payment Successful"
- store
-
payment_failed:When payment is failed / declined.
return:{ type: 'payment_failed', merchantTransID, sessionID, code, message }- store
merchantTransID,codeandmessage - Display error message(such as “Transaction Failed:
{message}”)
- store
-
payment_not_preformed:Triggered when payment is not executed (e.g. user does not complete the payment process)
return:{ type: 'payment_not_preformed', merchantTransID, sessionID, code, message }- store
merchantTransIDandcode - ** Display prompts (e.g. "Payment not completed, please try again")
- store
-
payment_cancelled:Triggered when the user cancels the payment
return:{ type: 'payment_cancelled', sessionID }- ** Display prompt (e.g. "Payment Cancelled")
6. Handling Payment webhooks:
Set the webhook endpoint from step 4 to receive asynchronous notifications from Evonet. Notifications typically contain the following fields:
result: payment status codemerchantOrderID: To check order statusmerchantTransID: To carry out payment refundsstatus: Order status code, used to update the database order status- Other parameters:time, amount, etc.
NoteAfter receiving a notification, the plain text "SUCCESS" must be returned to indicate successful receipt. If no response is received, the system will periodically resend asynchronous notifications at the specified frequency (15/15/30/180/1800/1800/1800/1800/3600 seconds) until a "SUCCESS" message is received or the maximum number of notifications is reached.
For parameters, please refer to API Explorer interaction Notification.
7. Using Drop-in for subscriptions
It is possible to use Drop-in to setup subscription scenario, the integration flow is about the same as above, only few minor adjustments as below:
First Time Subscription:
-
Change in the 4th step (Obtain sessionID)
When calling the Interaction API, use the following parameters:{ "userInfo": { "reference": "your_user_reference" }, "paymentMethod": { "recurringProcessingModel": "Subscription" } } -
Save the Token
- After payment is completed, store the
tokenfrom either webhook or payment response API. - Store the
token.valuein your system and bind it withuserInfo.reference.
- After payment is completed, store the
Subsequent subscription (MIT Transaction)
- Use the Payment API to initiate the transaction.
- The request parameters must include (see the Appendix Payment API interface for details):
{ "paymentMethod": { "token": { "value": "Previously saved token value" }, "recurringProcessingModel": "Subscription" } } - Order Tracking:Use
merchantTransIDto track the order ID of the subsequent payments. - Capture transactions:
- Set
captureAfterHoursto 0 for immediate capture - If this field is not provided, the merchant must later call the
POST /captureAPI to perform manual capture.
- Set
8. Other Optional APIs:
Using GET /payment/{merchantTransID} to query a payment status, merchantTransID is obtained from payment.merchantTransInfo.merchantTransID
For authorized transactions, this API can be used to carry out capture POST /payment/{merchantTransID}/capture
For transaction that is captured, use POST /payment/{merchantTransID}/refund to carry out partial or full refund of the transaction.
一、接入 SDK
通过 CDN 的方式拉取 JS 资源
建议在拉取失败时使用我们提供的 index.min.js 进行保底。
始终保持最新版本
https://cdn.jsdelivr.net/npm/cil-dropin-components@latest/dist/index.min.js
二、设置 DropIn 组件的 HTML 容器
在前端页面中添加一个容器元素,用于渲染 DropIn 组件,例如:
<div id="dropInApp"></div>三、获取 sessionID
在初始化 DropInSDK 之前,必须先获取 sessionID。后端通过调用 integration API 响应中获取 sessionID,需提取并传递给前端的 DropInSDK。
所有接口采用 KeyID、Key的方式进行鉴权,用于校验请求合法性,无需额外进行签名的加解密操作。
更多参数详情介绍:见 API Explorer 中的 interaction API 接口详情。
四、初始化 DropIn SDK
使用从上一步中获取的 sessionID 及其他必要参数初始化 DropInSDK,以渲染支付界面并处理用户交付:
const sdk = new DropInSDK({
  id: '#dropInApp',
  type: 'payment',
  sessionID: 'your-session-id',
  locale: 'en-US',
  mode: 'embedded',
  environment: 'UAT',
  appearance: {
    colorBackground: '#fff'
  },
  payment_completed: handlePaymentCompleted,
  payment_failed: handlePaymentFailed,
  payment_not_preformed: handlePaymentNotPreformed,
  payment_cancelled: handlePaymentCancelled
});
必要参数:
- id:容器 CSS 选择器
- type:组件类型
- sessionID:从支付 API 获取的唯一
sessionID - locale:界面语言代码(如
'en-US'、'zh-CN') - mode:显示模式(
'embedded'或'fullPage') - environment:SDK 发送请求的环境(如
'UAT'代表 Sandbox,'HKG_prod'代表生产)
可选参数:
- appearance:自定义界面样式
- 回调函数:见下一步
- 其他参数:参考 SDK reference 文档获取更多配置选项
五、处理支付回调事件
处理 DropInSDK 返回的支付回调,记录关键数据(如 merchantTransID),更新 UI,并触发后续操作。
-
payment_completed:支付成功时触发
返回:{ type: 'payment_completed', merchantTransID, sessionID }- 记录
merchantTransID(用于后续查询订单详情或退款) - 更新 UI 显示 “支付成功”
- 记录
-
payment_failed:支付失败时触发
返回:{ type: 'payment_failed', merchantTransID, sessionID, code, message }- 记录
merchantTransID、code和message(用于调试) - 显示错误提示(如 “支付失败:
{message}”)
- 记录
-
payment_not_preformed:支付未执行时触发(如用户未完成支付流程)
返回:{ type: 'payment_not_preformed', merchantTransID, sessionID, code, message }- 记录
merchantTransID和code - 显示提示(如 “支付未完成,请重试”)
- 记录
-
payment_cancelled:用户取消支付时触发
返回:{ type: 'payment_cancelled', sessionID }- 显示提示(如 “支付已取消”)
六、处理异步通知
设置第四步中 webhook 端点接收 Evonet 的异步通知。通知通常包含以下字段:
result: 订单结果merchantOrderID: 用于查询订单状态merchantTransID: 用于退款等操作status: 订单状态码,用于更新数据库订单状态- 其他元数据:时间、金额等
Note收到通知后,需返回纯文本 SUCCESS 表示接收成功。若未收到响应信息,系统会按照规定的频率(15/15/30/180/1800/1800/1800/1800/3600. 单位:秒)定期重新发送异步通知,直到成功收到 SUCCESS 或通知次数达到上限。
参数详见 API Explorer interaction Notification。
七、使用 Drop-in 实现订阅场景
通过 Drop-in 可实现订阅支付场景,整体流程同上面的描述,仅需在对应步骤进行如下调整即可:
首次订阅
-
第四步调整(获取 sessionID)
调用 Interaction 接口时,需设置以下特殊参数:{ "userInfo": { "reference": "your_user_reference" }, "paymentMethod": { "recurringProcessingModel": "Subscription" } } -
获取并保存 Token
- 支付完成后,从 webhook 回调通知或查询接口中获取
token。 - 将
token.value保存到后端数据库,并与userInfo.reference进行关联。
- 支付完成后,从 webhook 回调通知或查询接口中获取
后续订阅 (MIT 交易)
- 调用 Payment API 直接发起交易。
- 请求参数中需包含(详见附录 Payment API 接口):
{ "paymentMethod": { "token": { "value": "之前保存的token值" }, "recurringProcessingModel": "Subscription" } } - 订单跟踪:使用
merchantTransID跟踪后续订阅订单。 - 资金捕获:
- 通过
captureAfterHours字段设置自动捕获延迟小时数(例如"0"表示立即捕获),字符串格式。 - 若未上送此字段,则需后续调用
POST /capture接口进行手动捕获。
- 通过
八、可选接口
通过 GET /payment/{merchantTransID} 接口查询支付状态。merchantTransID 需从支付响应或异步通知中的 payment.merchantTransInfo.merchantTransID 中获取。
对于 authorized 状态的交易,可通过 POST /payment/{merchantTransID}/capture 完成最终扣款。
通过 POST /payment/{merchantTransID}/refund 接口对已经完成支付的订单发起全额或者部分退款。
Updated 3 months ago